
Introduction
Once developing pet projects or POCs, one might want to quickly see things working and actually cut some corners when it comes to real life project structure. One particular thing that always comes to mind while starting a new real life project is environment differentiation. Environment differentiation is paramount, in terms of real life development. On one hand, no one wants to develop a new system connected to the production environment and possibly mess the database up; on the other hand, having different environments (i.e. dev, staging, production) might speed integration of new features between backend and client systems, or even it might produce the desired flexibility over the workflow and deployment cycles (i.e. developing new feature locally in dev environment, then deploy it to a staging or qa environment for further testing the integration and that everything works well before actually delivering it to production).
In specific, Flutter has a way of mapping android flavors and ios schemes to produce the desired build variants covering the different environments, and that is at most ok. Here in Capyba, we've always felt like something was missing, and over and over we've been repeating some manual tasks in order to properly achieve the desired distinction of environments when developing real life Flutter projects. As we use Flutter for Android and Ios development, the aim of this article is to summarize and standardize these manual tasks done explicitly on Android and Ios, so it can serve as future reference for our company, and hopefully for other companies and solo developers that might as well, face the same challenges when developing Flutter projects.
Our requirements
To avoid misleading running apps that do not properly point out the current environment or do not properly connect to its corresponding specific services, we've come up with a list of requirements that must be met by all our Flutter/mobile projects.
Namely, different environments should produce apps with:
- Different bundle/application ids so that multiple instances of the app pointing to different environments could be installed at the same time.
- Different app launcher icons and different display names, so that they are seamlessly distinguishable from each other.
- By default Flutter builds apps with a Banner at the top right corner to identify debug builds, adding on that, we've decided to have a Banner at the top left corner with the name of the environment, in case of running the app in an environment other than production, or with 'ENVLESS' when no environment is yet set.
- If the app communicates with some specific service (i.e. Firebase services), every environment should be configured separately on its own (i.e. firebase project).
- Environment variables should be placed on .env files that shouldn't be kept in version control, in order to maintain a semantic equivalence of environment variables treatment of other technologies.
Requirements from 1 to 3, are the easy ones, although configuration for Android and Ios have different approaches, as we are going to see shortly, these requirements can be met in a straightforward way. On the other hand, requirements 4 and 5, needed some additional steps that we are going to describe too.
For the sake of concreteness we will from now on consider three environments: dev, staging and production, and proceed step-by-step in the configuration first on Android, and then on iOS and Flutter.
It is important to make a disclaimer here: specially on Android, it is possible to do things in different ways, and the aim here, rather than showing a unique form or the best form, is to present ONE form of accomplish the desired requirements. Now, let's move on to the setup.
Android Setup
- Let's go to app module build.gradle -> android/app/gradle, and add definition of property flavorDimensions, here we will use only "default", and then add definition of productFlavors property setting for each environment a property with fields dimension "default", and we will add a applicationIdSuffix with the name of the environment (for all but production environment) to produce the desired different application ids. Things should look like this:
```groovy
…
defaultConfiguration {
applicationId "com.capyba.example"
…
}
flavorDimensions "default"
productFlavors {
dev {
dimension "default"
applicationIdSuffix ".dev"
}
staging {
dimension "default"
applicationIdSuffix ".staging"
}
production {
dimension "default"
}
}
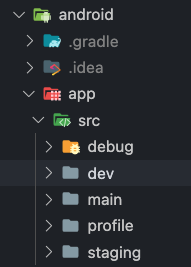
``` - Afterwards, let's create a folder for each environment (all but production environment) at android/app/src/, like this
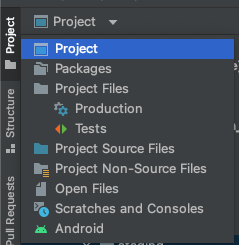
- Now, as we've proposed, we need to generate data for the dev and staging launcher icons. One easy way of doing this is using AndroidStudio. Let's open the project's android folder on AndroidStudio. Now, after project syncing, change view from Android to Project.
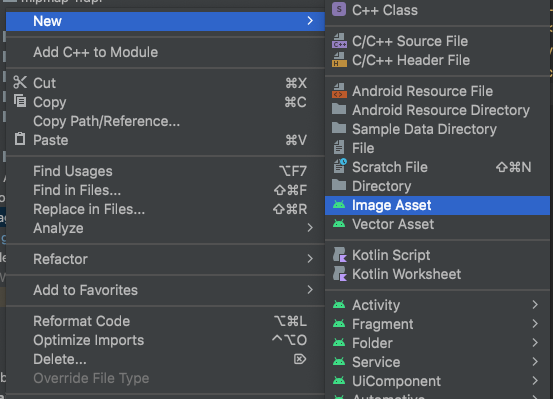
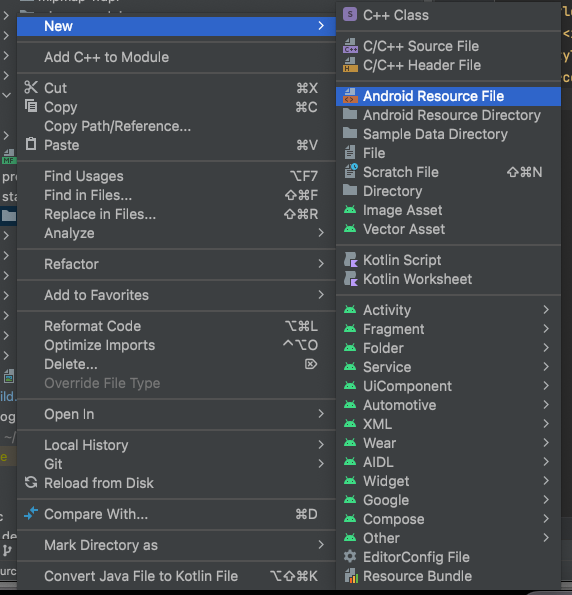
Then, go to one of env folders created in the last step and right click on it, selecting New->Image Asset, like this:
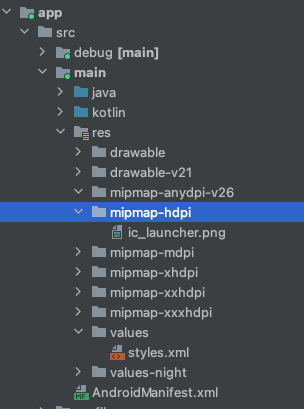
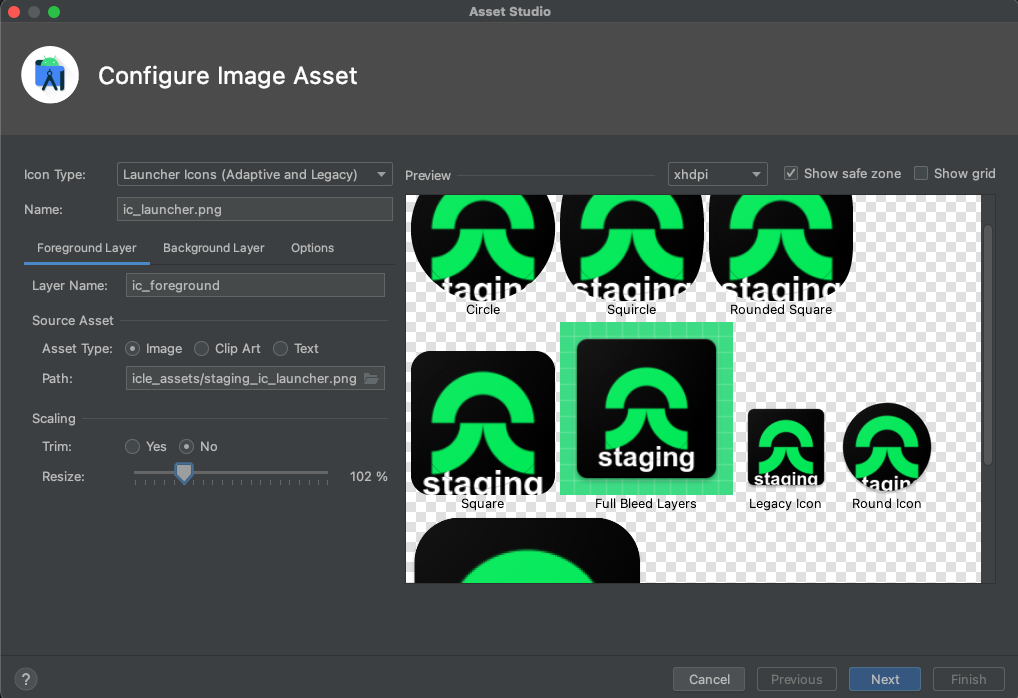
- A window will prompt so that one can select the path for the icon related to the selected environment, and name it with the same name of the mipmap on the main/module/res folder, in the example the name is the default ic_launcher :
the prompted window is as follows:
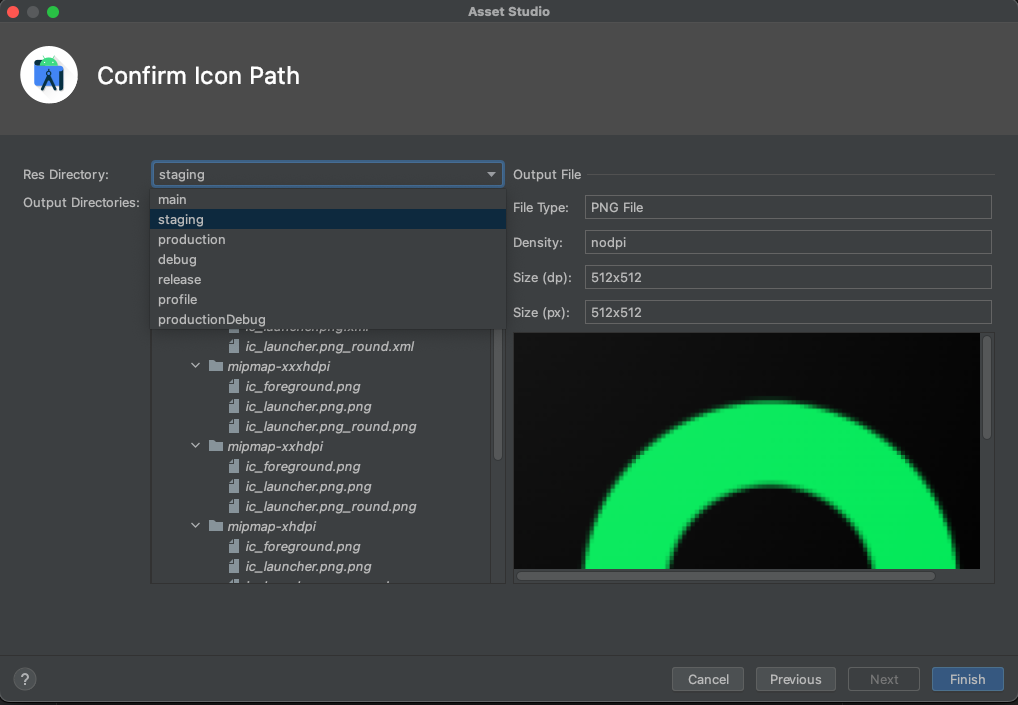
Hit next button and then choose the res folder of the correspondent environment as destination, in the example, staging, like this:
- repeat steps 3 and 4 for every environment
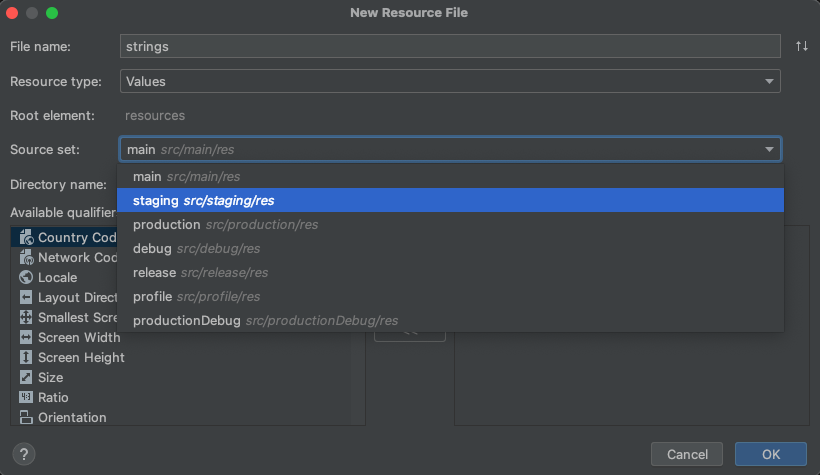
- Now, let's add a strings resources file to the environment being configured folder. First right-click on the res folder and select New->android resource file, give it a name, for instance, strings.xml and add a resource string named, for example, app-display-name, (the particular chosen name is not relevant here). Repeat it for every desired environment,( even for production/main module this time)
```
<?xml version="1.0" encoding="utf-8"?>
<resources>
<string name="app_display_name">Capyba's Example Dev</string>
</resources>
```- Now, we just have to pass this string resource to the label parameter at main module:
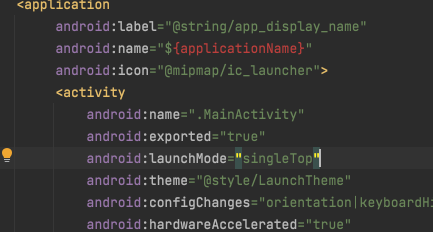
Now, I've completed requirement 2 for android, and we might continue just skipping for now, Flutter configuration, as we are going to let this part to the end.
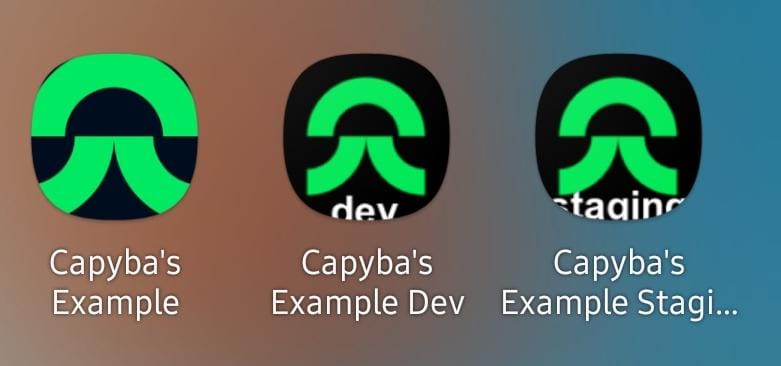
And for now, we have three different apps, with custom launcher icons and names that could be installed at the same time on the same Android device, one for each environment:
IOs setup
Now, let's replicate the same results on IOs, (unfortunately, this can be accomplished only using a macOS machine). Let's start opening the ios/ subfolder of the project using xcode.
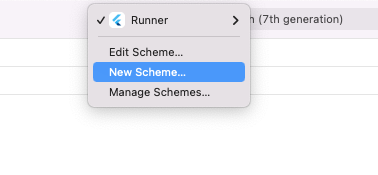
- Click on Runner (on the right of the source control) -> New Scheme.
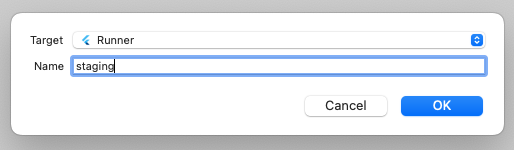
- Add the desired schemes, one for each environment. i.e.: dev, staging, (like on android we will reserve the default scheme for production environment.)
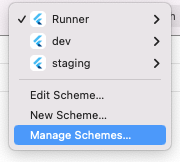
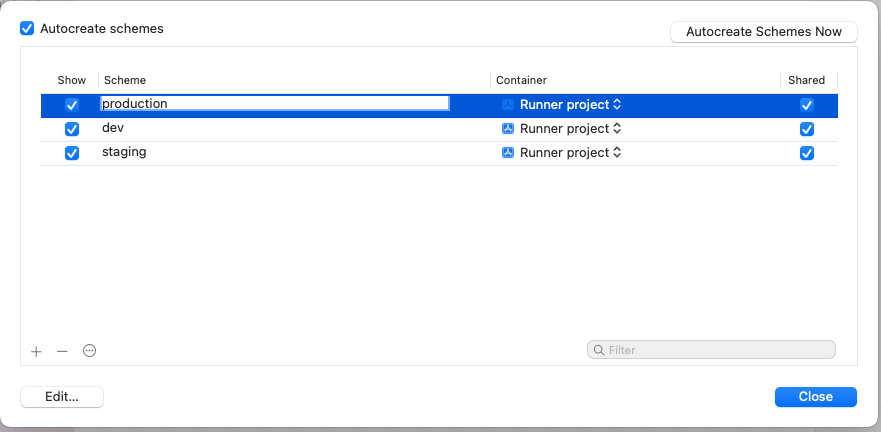
- Go to Runner -> Manage Schemes and rename the default Runner scheme to production
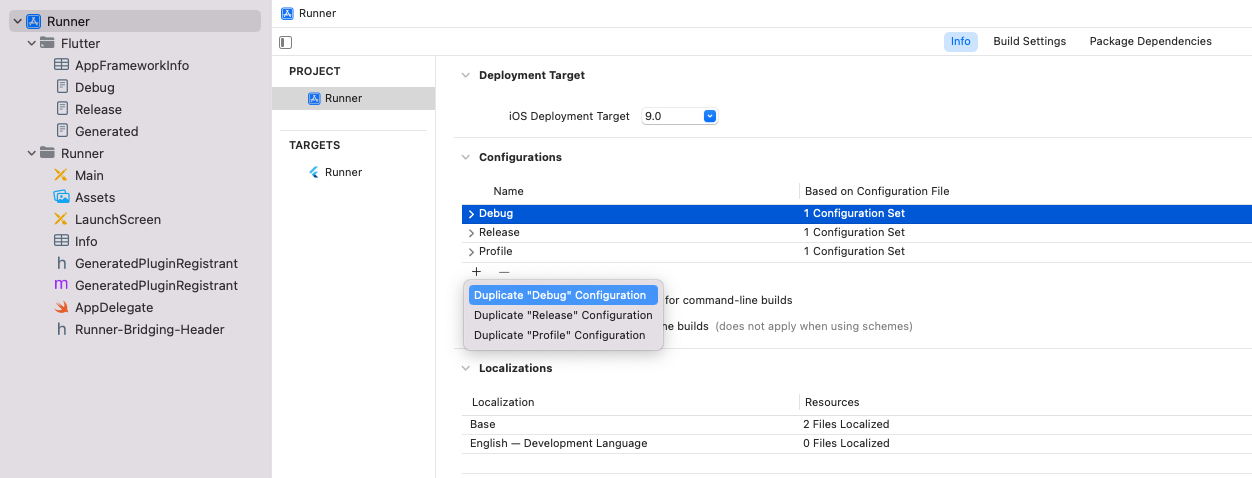
- In the project structure pane, select Runner, then select Project->Runner, then in tab info, select debug configuration and click on the plus icon, then select Duplicate Debug Configuration, and rename the copy to Debug-dev. Repeat it for Release and Profile configurations. And then, repeat the same steps for the other environments other than production.
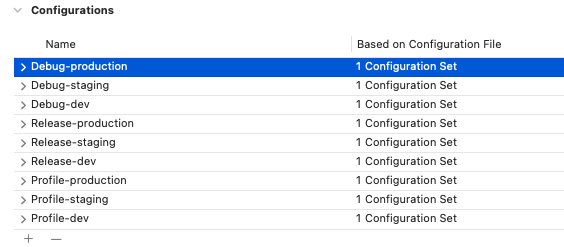
- Rename the Release, Profile and Debug configurations to Release-production, Profile-production and Debug-production, and that's the result.
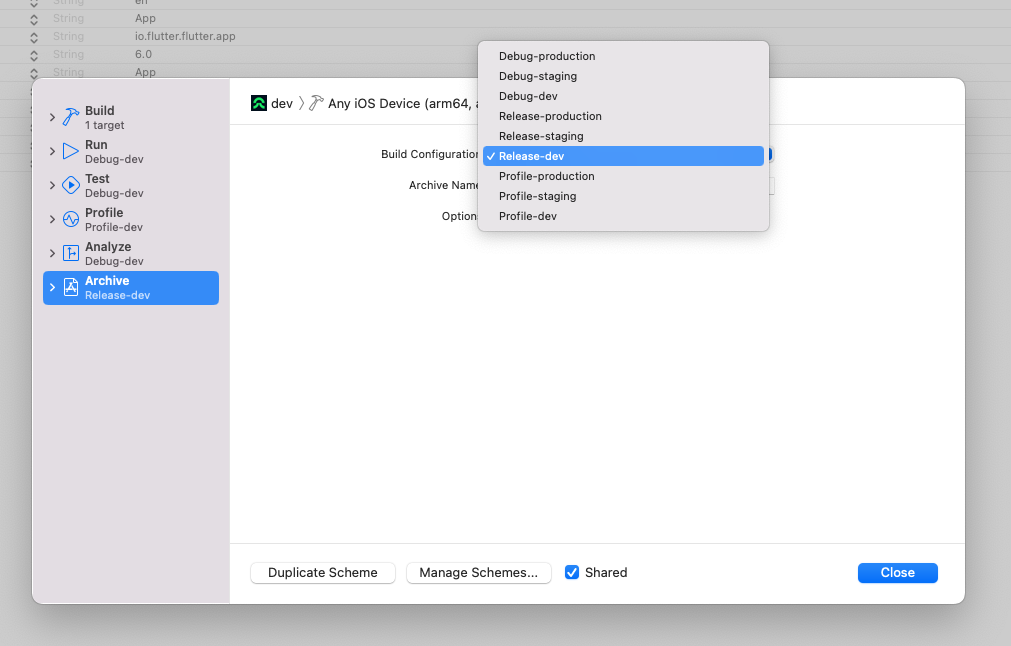
- Now, go back to manage schemes and connect the build configuration with the correct to each environment (repeat for each environment/scheme):
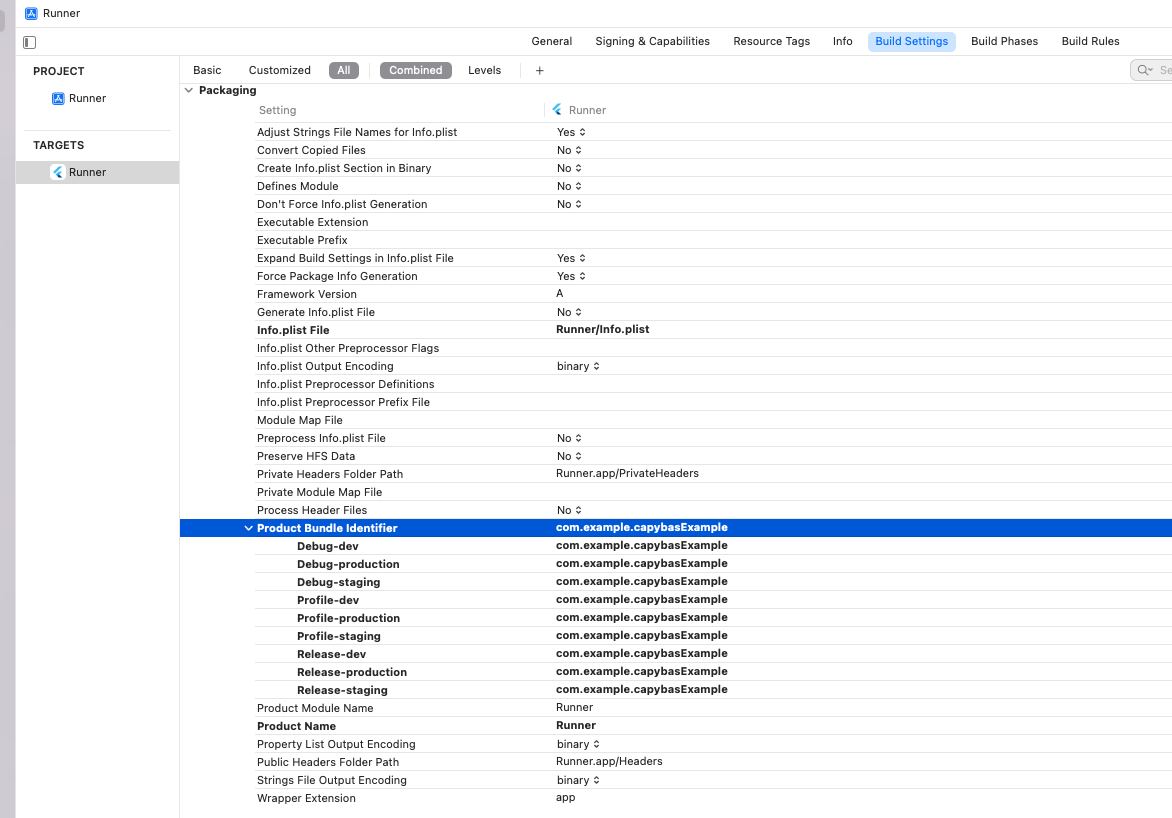
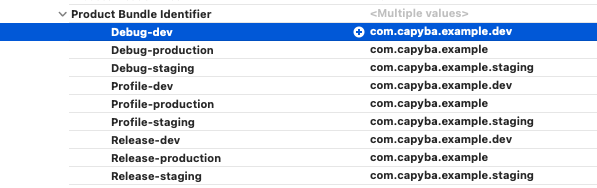
- Now, go to Runner target, and then to Build Settings->Packaging->Product Bundle identifier. Here we can give a bundle Identifier for each build configuration. For envs, other than production, we are going to add a suffix to the package bundle identifier, i.e: production: com.capyba.example, dev: com.capyba.example.dev .
after renaming:
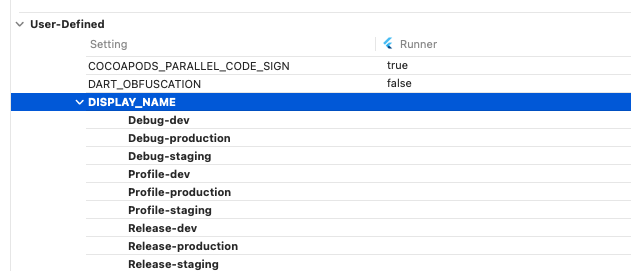
- Let's add User-Defined Settings and create DISPLAY_NAME, and set a name for each build variant:

create DISPLAY_NAME:
Add values to it:
- Connect the DISPLAY_NAME, with the option in the info tab:

- Now, let's add assets for each appLauncher and connect it to each scheme. Go to Runner->Runner->Assets on the project structure pane, and then, hit the plus icon->ios->ios appIcon:
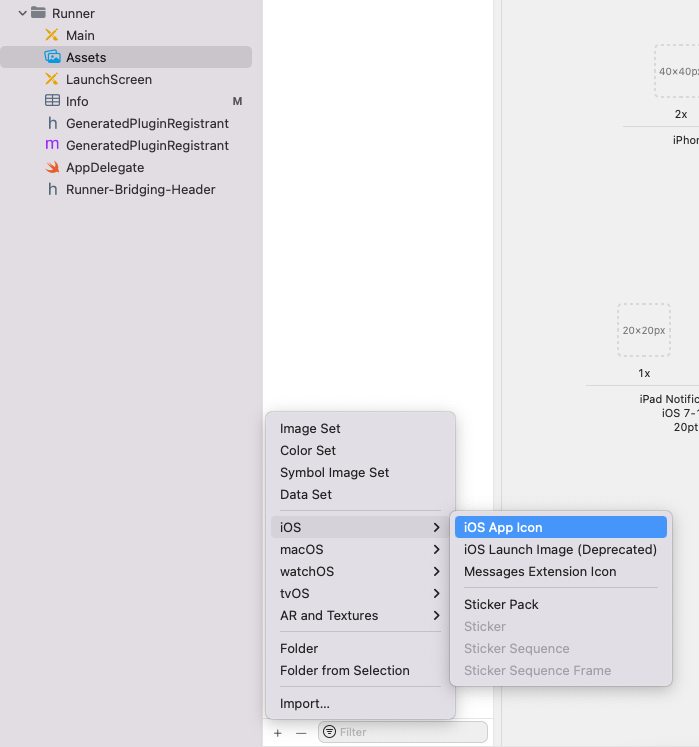
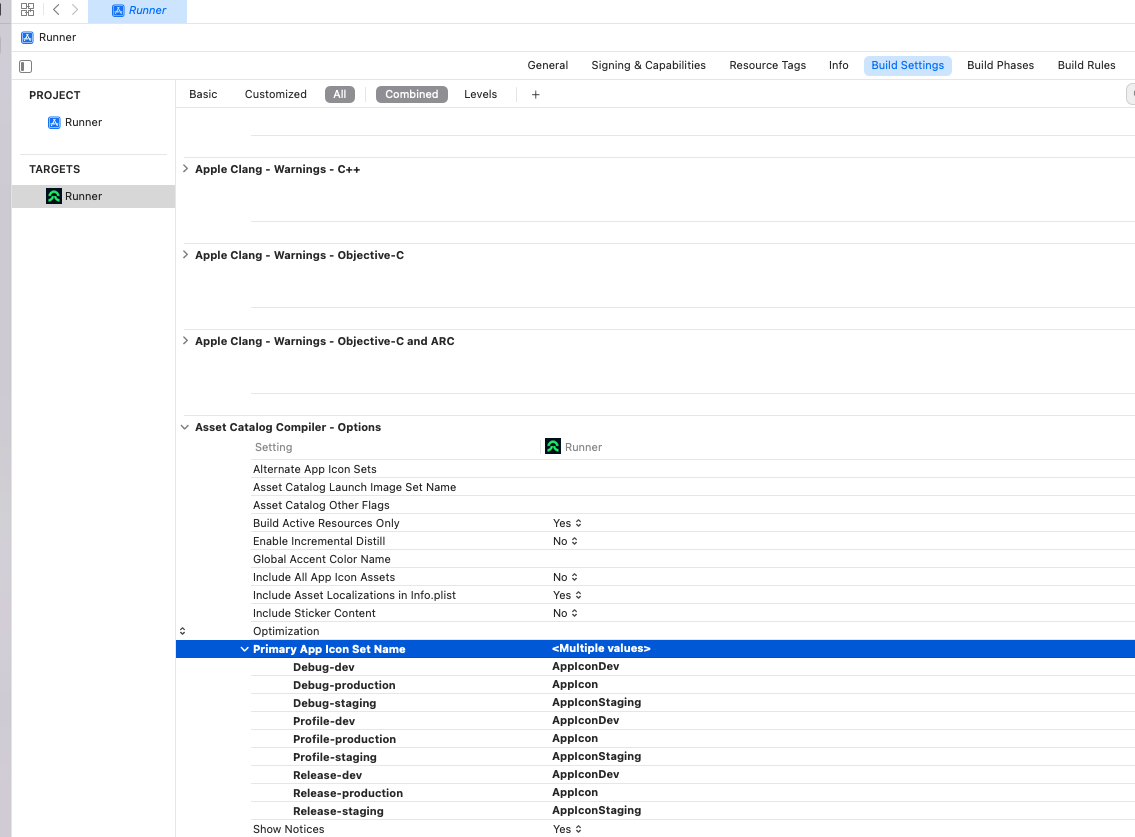
and after adding assets for each scheme, let's connect them to each scheme. Go back to Runner target, and then to Build Settings->Primary App Icon set name, and choose the correct icon for each scheme:
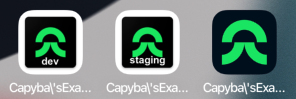
And now I've accomplished the same two requirements for Ios, and we have now, three different installable apps with, different Display names, and app icons:
Flutter setup
To accomplish what we want in terms of in app differentiation, we are going to use –dart-define to pass values on compile time to code and then use them. In order to automate the process we've decided to write a Makefile, and add some shell scripting to the process, this way, we've come up with a setup where we have .env.dev (.env.staging, or .env.ENVNAME in general), and our custom command make run-debug env=dev (env=ENVNAME in general), reads this file getting the correct environment related variables and builds up the final command that is actually passed to the terminal to run Flutter with the correct flavor (mapped to android flavors and ios schemes). As an example, our Makefile looks like:
```Makefile
env=dev
run-debug-envless:
bash scripts/fvm-run.sh flutter run
run-release-envless:
bash scripts/fvm-run.sh flutter run --release
run-debug: .env.$(env)
bash scripts/fvm-run.sh flutter run --flavor $(env) -t lib/main.dart $(shell awk '{print "--dart-define=" $$0}' .env.$(env))
run-release: .env.$(env)
bash scripts/fvm-run.sh flutter run --flavor $(env) -t lib/main.dart --release $(shell awk '{print "--dart-define=" $$0}' .env.$(env))
```
where we use FVM to control Flutter version among all developers' machines over time, and the …-envless version of commands are used when no environment is yet set.
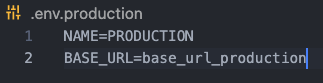
For the sake of concreteness, we are going to set as environment variables, just the name of the environment and a mock base url, showing the power of the approach.
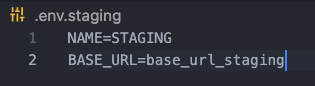
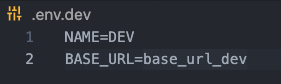
So, create the files .env.dev, .env.staging and .env.production, add them to .gitignore, and optionally a .env.example, that will be kept in source control. Add the values to each file:
And to receive the variables, let's create a Env class:
```dart
class Env {
static const name = String.fromEnvironment('NAME');
static const baseUrl = String.fromEnvironment('BASE_URL');
}
class Envs {
static const DEV = 'DEV';
static const STAGING = 'STAGING';
static const PRODUCTION = 'PRODUCTION';
}
```
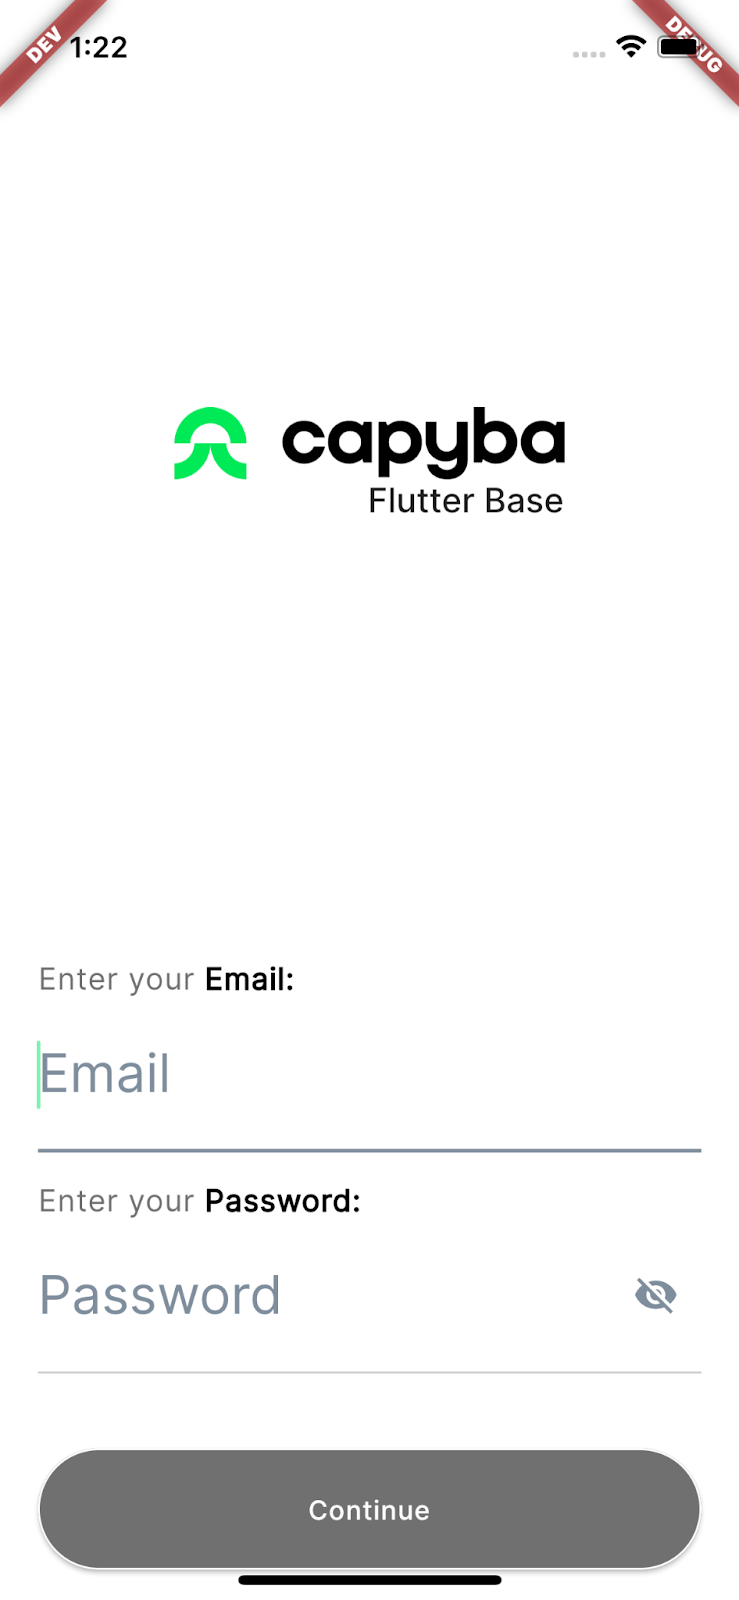
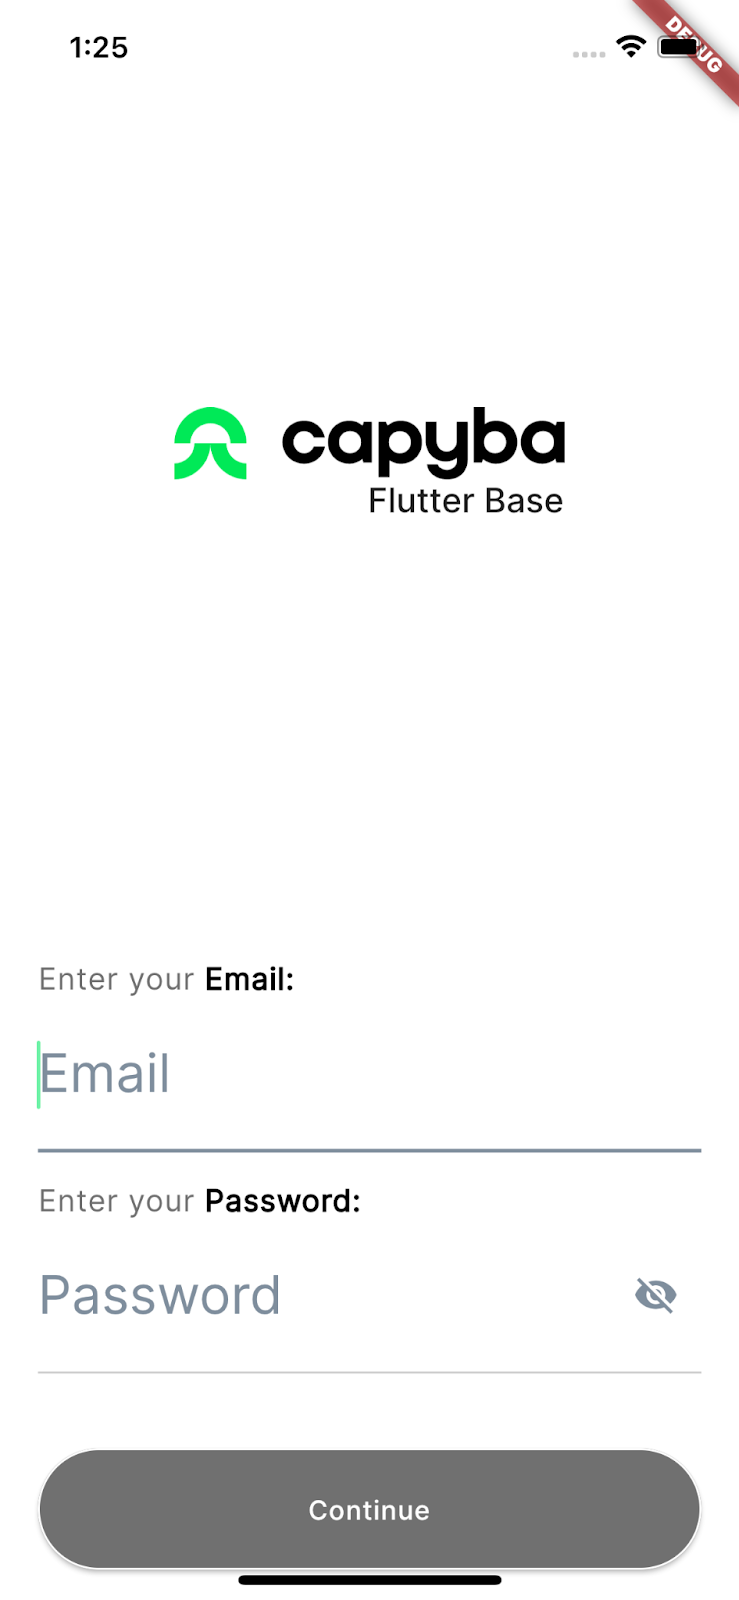
And to your MaterialApp, add the builder option:
```dart
…
builder: (context, child) => Env.name != Envs.PRODUCTION
? Env.name.isNotEmpty
? Banner(
message: Env.name.toString(),
textDirection: TextDirection.ltr,
location: BannerLocation.topStart,
child: child,
)
: Banner(
message: "ENVLESS",
textDirection: TextDirection.ltr,
location: BannerLocation.topStart,
child: child,
)
: child!,
```
And with that, we've already accomplished requirements 1, 2, 3 and 5, and now we have in app differentiation too:

Firebase Configuration
To finish our configuration, we are going to configure the Firebase for each environment, using different projects, as recommended by Firebase Documentation.

- create a Firebase project for each environment i.e.: capyba-example-dev, capyba-example-staging and capyba-example
- hit to add a flutter app to the project, and the guide will ask you to have the flutterfire cli installed, and point out documentation that helps achieving that.
- Let's start with one of the environments, i.e. dev. Run the command flutterfire configure --project=capyba-example-dev --ios-bundle-id=com.capyba.example.dev --android-app-id=com.capyba.example.dev
Note that you need to be authenticated in the account where the project is registered in the FirebaseCli, but don't worry, the cli will prompt you to do so! - Select the platforms you want to configure your app into, in this tutorial those are Android, and IOs.
- Once you do that, cli will proceed and register one app for each platform on your Firebase project and generate the related configuration files. In this case, the google-services.json on Android, and firebase_app_id_file.json on IOs. The thing is, those files need to be placed in specific places to be read by each platform during build. For android, it is quite simple, you just move the file to the environment folder (the same that contains environment specific resources folder) like this
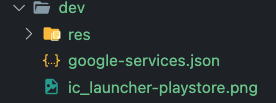
for all environments but production's. For production you can let the file in the default destination as it was created by FlutterfireCli.
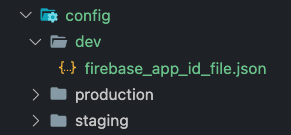
For IOs, we need to do a more creative solution. As you can notice in the ios project folder structure, there is no such thing as separate folder for each environment/schema, so the configuration file have just one place to be, and it must have the default name, so the FlutterFire plugin can read the configuration file and connect our flutter app with the correct Firebase project once the app is built. To cope with this, we've made use of two suitable scripts, one to delete the previously placed config file from the correct final path, and another to copy the current file to the correct final path. Before proceeding, create a folder inside ios/ subfolder named config/ and folders inside it, one for each environment your project will have. In this case, move the just created firebase_app_id_file.json to the folder /ios/config/dev/:
Go to target Runner->Build Phases and hit the plus icon selecting "New Run Script Phase"
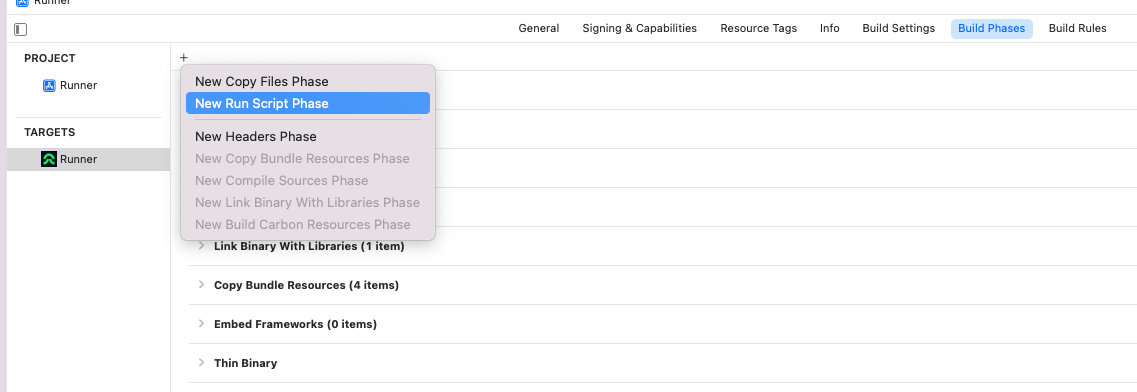
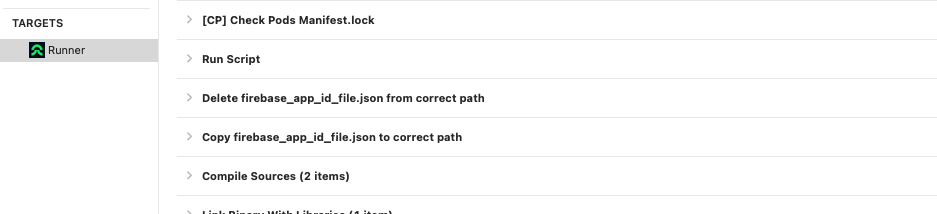
Add two run script phases, name them with a suitable name and drag drop them between Run Script and Compile Sources
For, the delete script, paste the code bellow
```shell
PLIST_DESTINATION=${BUILT_PRODUCTS_DIR}/${PRODUCT_NAME}.app
rm "${PROJECT_DIR}/firebase_app_id_file.json"
echo "firebase_app_id_file.json deleted"
```
and for the copy script, paste the code (this script was tailored for the case where there are three environments with the names we've gave here, remember to adjust the script to your environments names and numbers)
```shell
PLIST_DESTINATION=${BUILT_PRODUCTS_DIR}/${PRODUCT_NAME}.app
echo PLIST_DESTINATION
if [ "${CONFIGURATION}" == "Debug-production" ] || [ "${CONFIGURATION}" == "Release-production" ] || [ "${CONFIGURATION}" == "Profile-production" ] || [ "${CONFIGURATION}" == "Release" ]; then
cp "${PROJECT_DIR}/config/production/firebase_app_id_file.json" "${PROJECT_DIR}/firebase_app_id_file.json"
echo "Production firebase_app_id_file.json copied"
elif [ "${CONFIGURATION}" == "Debug-staging" ] || [ "${CONFIGURATION}" == "Release-staging" ] || [ "${CONFIGURATION}" == "Profile-staging" ] || [ "${CONFIGURATION}" == "Debug" ]; then
cp "${PROJECT_DIR}/config/staging/firebase_app_id_file.json" "${PROJECT_DIR}/firebase_app_id_file.json"
echo "Staging firebase_app_id_file.json copied"
elif [ "${CONFIGURATION}" == "Debug-dev" ] || [ "${CONFIGURATION}" == "Release-dev" ] || [ "${CONFIGURATION}" == "Profile-dev" ] || [ "${CONFIGURATION}" == "Debug" ]; then
cp "${PROJECT_DIR}/config/dev/firebase_app_id_file.json" "${PROJECT_DIR}/firebase_app_id_file.json"
echo "Dev firebase_app_id_file.json copied"
fi
```- Now, let's wire things with our .env files. On your dart code, the Flutterfire cli created a firebase_options.dart , and if you go to this file, you are going to see that everything is connected with the correct data of your firebase project for the Dev environment. So, let's add those values to the .env.dev file, and once we do the same for the other environments, all the data will be placed in the .env files that are going to be read and passed to our dart code during compile time using dart-define. Now our .env file has these fields:
```
NAME=DEV
BASE_URL=base_url_dev
FIREBASE_ANDROID_API_KEY=
FIREBASE_IOS_API_KEY=
FIREBASE_MESSAGING_SENDER_ID=
FIREBASE_PROJECT_ID=
FIREBASE_STORAGE_BUCKET=
FIREBASE_ANDROID_APP_ID=
FIREBASE_IOS_APP_ID=
FIREBASE_IOS_CLIENT_ID=
FIREBASE_IOS_BUNDLE_ID=
```
Reproduce the same structure to all your .env.files, and copy the values from the firebase_options.dart to the .env.dev. Now, go to the env.dart file, and create the fields that are going to receive the values from the .env.
```dart
class Env {
static const name = String.fromEnvironment('NAME');
static const url = String.fromEnvironment('URL');
static const firebaseAndroidApiKey = String.fromEnvironment(FIREBASE_ANDROID_API_KEY);
static const firebaseIosApiKey = String.fromEnvironment(FIREBASE_IOS_API_KEY);
static const firebaseAppIdAndroid = String.fromEnvironment('FIREBASE_APP_ID_ANDROID');
static const firebaseAppIdIos = String.fromEnvironment('FIREBASE_APP_ID_IOS');
static const firebaseMessageSenderId = String.fromEnvironment('FIREBASE_MESSAGE_SENDER_ID');
static const firebaseProjectId = String.fromEnvironment('FIREBASE_PROJECT_ID');
static const firebaseStorageBucket = String.fromEnvironment('FIREBASE_STORAGE_BUCKET');
static const firebaseIosClientId = String.fromEnvironment('FIREBASE_IOS_CLIENT_ID');
static const firebaseIosBundleId = String.fromEnvironment('FIREBASE_IOS_BUNDLE_ID');
}
``` - We're almost there! Repeat the steps 3 to 6 for the rest of the environments, skipping the creation of run script steps, and remember to place the config files in the right place after each run!
- As a last step, let's initialize the FirebaseApp in our main function on dart code, and wire the Env class with the firebase_options file:
```dart
…
static const FirebaseOptions android = FirebaseOptions(
apiKey: Env.firebaseAndroidApiKey,
appId: Env.firebaseAndroidAppId,
messagingSenderId: Env.firebaseMessagingSenderId,
projectId: Env.firebaseProjectId,
storageBucket: Env.firebaseStorageBucket,
);
static const FirebaseOptions ios = FirebaseOptions(
apiKey: Env.firebaseIosApiKey,
appId: Env.firebaseIosAppId,
messagingSenderId: Env.firebaseMessagingSenderId,
projectId: Env.firebaseProjectId,
storageBucket: Env.firebaseStorageBucket,
iosClientId: Env.firebaseIosClientId,
iosBundleId: Env.firebaseIosBundleId,
);
```
and finally initialize the firebase app:
```dart
void main() async {
WidgetsFlutterBinding.ensureInitialized();
await Firebase.initializeApp(
options: DefaultFirebaseOptions.currentPlatform,
);
…
}
```
Conclusion
It was a long run, but after these steps we should have a fully configured project with the desired level of environment differentiation, namely, different apps for each environment showing different app launcher icons, different display names, with in app differentiation and connecting to specific services for each environment. As it stands now, the second semester of 2022, a lot of manual steps are still needed to get something like this working, but we at Capyba understand that it is a low price to pay in comparison with the safety and flexibility in producing different workflows that it brings!
This is our first attempt to document all this process, and suggestions and improvements are by all means welcome! A special thanks to my tech leader Ibiã Marques dos Santos for encouraging me to document this, as I believe this builds a lot of value specially for the internal processes at our company, but still might present a valuable source of research
for the community as well. Another special thanks to George Verissimo, our marketing and general purpose wizard, for always doing his magic in helping format and present content in the best possible way!


