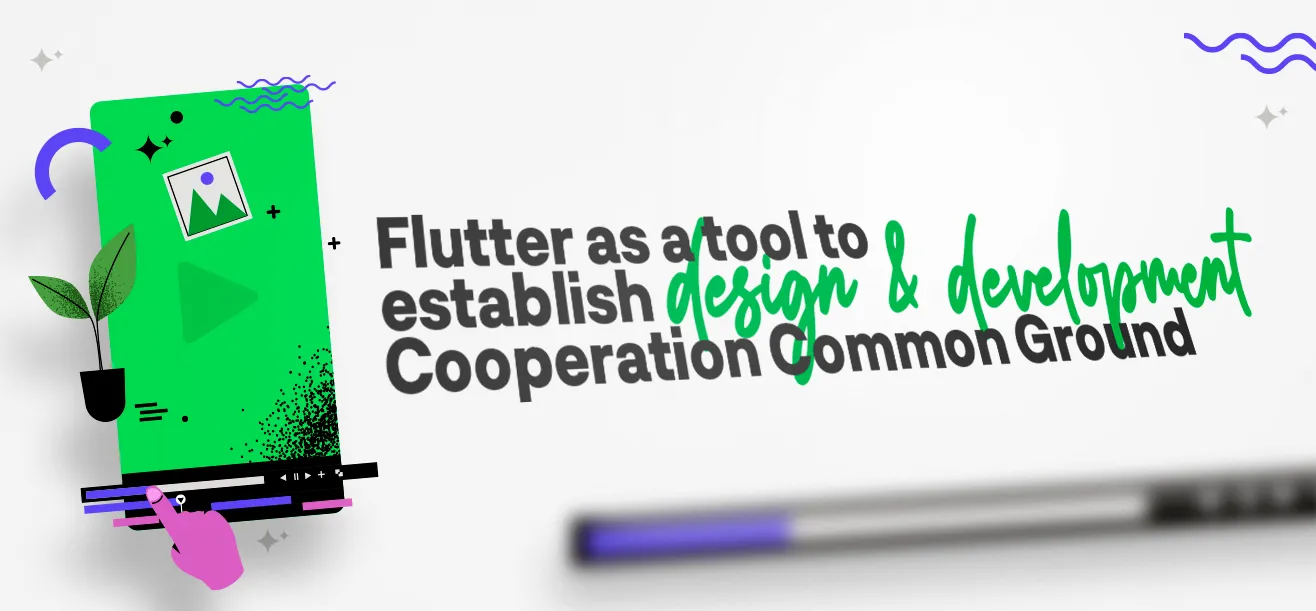
In a lot of different areas there is a false conflict between people who design things and people in charge of building things, and in my experience, software development is not different from other areas like construction or industry. Meaning that people who are meant to work together, like UI/UX designers and software developers, are more frequently than they should, spending energy not cooperating with each other and arguing about the feasibility of features. Although, there is some reason for the arguing, I mean, spending too much time building a software might determine the viability of that product; there is no reason why these two ends couldn’t find a common ground to produce a system visually appealing, functional and aiming for the best user experience potential it has.
With the evolution of the ecosystem of frameworks that help to achieve that goal of producing the best possible software in terms of UI/UX, we point out that one of the best frameworks to create that common ground required for optimal cooperation between design and development teams is Flutter. Flutter is nearly a sandbox where one, with less effort than any known hybrid framework, can produce the largest range of different UIs. So, instead of trying to argue conceptually about why we believe Flutter is a good tool to bring design and development teams together, we`ve decided to try and show it by experimenting with the implementation of a proof of concept.
The usage of an introductory screen where the app can fetch data from backend, evaluate auth state, or any other custom task needed to load and get things up and running; have never been so common. It is usually named as Splash screen, It presents a chance to build your brand identity, deliver some cool marketing campaigns, etc, possibilities are numerous! It means that you need to keep the app user occupied while all those things are happening. One option to achieve this is to use a static screen, with your brand logo, colors, maybe name, something like this:
class CapybaDaySplashScreen extends StatelessWidget {
  const CapybaDaySplashScreen({super.key});

  @override
  Widget build(BuildContext context) {
    return Scaffold(
      backgroundColor: ColorTokens.capybaPurple,
      body: Center(
        child: Stack(
          children: [
            const SizedBox(
              height: 113,
              width: 208,
            ),
            Row(
              mainAxisAlignment: MainAxisAlignment.center,
              crossAxisAlignment: CrossAxisAlignment.end,
              mainAxisSize: MainAxisSize.min,
              children: [
                Image.asset(
                  CapybaDayTwentyThreeTestImages.capyba,
                  width: 183,
                  height: 48,
                ),
                const SizedBox(width: 8),
                Column(
                  mainAxisSize: MainAxisSize.min,
                  children: [
                    Image.asset(
                      CapybaDayTwentyThreeTestImages.twentyThree,
                      width: 117,
                      height: 57,
                    ),
                    const SizedBox(height: 9),
                  ],
                ),
              ],
            ),
            Positioned(
              right: 0,
              child: Stack(
                alignment: Alignment.center,
                children: [
                  const SizedBox(height: 113, width: 117),
                  Positioned(
                    top: 21,
                    child: Image.asset(
                      CapybaDayTwentyThreeTestImages.capivara,
                      width: 88,
                      height: 92,
                    ),
                  ),
                ],
              ),
            ),
            Positioned(
              right: 18,
              bottom: 4.57,
              child: Stack(
                alignment: Alignment.bottomLeft,
                children: [
                  const SizedBox(width: 170, height: 87.4),
                  Image.asset(
                    CapybaDayTwentyThreeTestImages.day,
                    height: 48.8,
                    width: 100.9,
                  ),
                ],
              ),
            ),
          ],
        ),
      ),
    );
  }
}
That would probably do the job, and in most cases should work. And usually, with a project already set, you should be able to build such a screen in about 1h. But sometimes we need to add some motion to things to focus on what matters, like your brand logo, or even to produce a more fluid user experience, distracting the user from the time spent on this step. Well, if the technical difficulties to implement such an animated solution are too time consuming, any manager would probably cut corners at this point and say that it is too expensive, that it doesn’t pay off, and he/she would probably be making the right call. That would produce at least two possible outcomes. On one hand, the developer side would be probably relieved to not have to spend many hours just producing the correct ui, on the other hand, the design team would probably get frustrated to not having a great solution been implemented because of technical difficulties beyond their reach. (at least, my projection of those two personas would feel like I described). In the long run, this kind of friction could cause the conflict described in the abstract. So let’s try to create such an animated screen, using just some assets and Flutter’s native implicit animations, showcasing the point defended here: UI/UX matters, and we can produce a lot of cool stuff using Flutter with minimum efford.
To implement the animation proposed for this splash screen by our Designer Mage José Gervásio, we will use a concept described in Flutter’s official documentation: Staggered Animations. Quoting the documentations: “Staggered animations are a straightforward concept: visual changes happen as a series of operations, rather than all at once”. The common pattern used to implement those kinds of animations is to have a StatefulWidget (or a HookWidget if you’re into FlutterHooks, which I highly recommend if you don’t know or use yet!) that provides one AnimationController and orchestrates all the animation objects presented in another widget, this one Stateless. Each animation object defined in the StatelessWidget specifies an animation during an Interval, and each property being animated would create a Tween (funny name chosen by the Flutter team to refer to beTween).
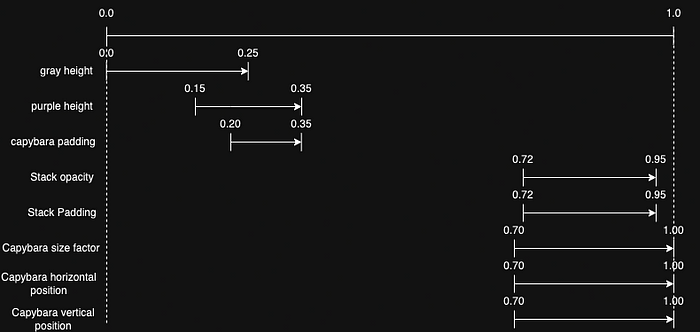
We can divide implementation in three steps. In the first step, we have colorful stripes changing size giving this sense of motion, and it takes, say, 35% of the total animation time. In this step we have first a gray frame that starts to shrink, and after some time, two stripes, one pink and another yellow, start expanding, and at some point a purple container starts showing and it will become the background of the endscreen. In the second step, that starts at around 20% of animation duration (it means that there is overlap, that is quite simple to control, as we’ll see), our sharming Capybara mage shows, changing slightly its vertical position. And finally, in the third step, two things happen simultaneously, our Capybara mage shrinks and animates its position to stop at its desired position at the final splash image, and the other elements, Fadein and slides to its final position.
We can see in the diagram below the intervals described:
We could have a StatefulWidget like this:
class CapybaDayAnimatedSplashScreen extends StatefulWidget {
  const CapybaDayAnimatedSplashScreen({super.key});

  @override
  State<CapybaDayAnimatedSplashScreen> createState() =>
      _CapybaDayAnimatedSplashScreeState();
}

class _CapybaDayAnimatedSplashScreeState
    extends State<CapybaDayAnimatedSplashScreen> with TickerProviderStateMixin {
  late AnimationController _controller;

  @override
  void initState() {
    super.initState();

    _controller = AnimationController(
      vsync: this,
      duration: const Duration(milliseconds: 3000),
    );
    Future.delayed(const Duration(milliseconds: 300))
        .then((value) => _controller.forward());
  }

  @override
  void dispose() {
    super.dispose();
    _controller.dispose();
  }

  @override
  Widget build(BuildContext context) {
    return SplashStaggeredAnimation(
      controller: _controller.view,
      viewportSize: MediaQuery.of(context).size,
    );
  }
}
The proposed duration for the whole animation is 3 seconds and it’s set to start 300 milliseconds after the screen is shown.
And the StatelessWidget that will produce the desired animation is shown below:
class SplashStaggeredAnimation extends StatelessWidget {
  SplashStaggeredAnimation({
    super.key,
    required this.controller,
    required this.viewportSize,
  })  : grayHeight =
            Tween<double>(begin: viewportSize.height, end: 0.0).animate(
          CurvedAnimation(
            parent: controller,
            curve: const Interval(
              0.0,
              0.250,
              curve: Curves.easeInOutQuad,
            ),
          ),
        ),
        purpleHeight =
            Tween<double>(begin: 0, end: viewportSize.height).animate(
          CurvedAnimation(
            parent: controller,
            curve: const Interval(
              0.150,
              0.350,
              curve: Curves.easeOutSine,
            ),
          ),
        ),
        capybaraPadding = EdgeInsetsTween(
          begin: const EdgeInsets.only(top: 48),
          end: EdgeInsets.zero,
        ).animate(
          CurvedAnimation(
            parent: controller,
            curve: const Interval(
              0.200,
              0.350,
              curve: Curves.easeOutSine,
            ),
          ),
        ),
        staticStackOpacity = Tween<double>(
          begin: 0.0,
          end: 1.0,
        ).animate(
          CurvedAnimation(
            parent: controller,
            curve: const Interval(
              0.720,
              0.950,
              curve: Curves.ease,
            ),
          ),
        ),
        staticStackPadding = EdgeInsetsTween(
          begin: const EdgeInsets.only(top: 100),
          end: EdgeInsets.zero,
        ).animate(
          CurvedAnimation(
            parent: controller,
            curve: const Interval(
              0.720,
              0.950,
              curve: Curves.ease,
            ),
          ),
        ),
        capybaraSizeFactor = Tween<double>(
          begin: 1.0,
          end: 0.48,
        ).animate(
          CurvedAnimation(
            parent: controller,
            curve: const Interval(
              0.700,
              1.000,
              curve: Curves.ease,
            ),
          ),
        ),
        capybaraFinalHorizontalPosition = Tween<double>(
          begin: 61.8,
          end: 17.3,
        ).animate(
          CurvedAnimation(
            parent: controller,
            curve: const Interval(
              0.700,
              1.000,
              curve: Curves.ease,
            ),
          ),
        ),
        capybaraFinalVerticalPosition = Tween<double>(
          begin: (viewportSize.height - 192.7) / 2,
          end: (viewportSize.height - (192.7 - 122)) / 2,
        ).animate(
          CurvedAnimation(
            parent: controller,
            curve: const Interval(
              0.700,
              1.000,
              curve: Curves.ease,
            ),
          ),
        );

  final Animation<double> controller;
  final Size viewportSize;
  final Animation<double> grayHeight;
  final Animation<double> purpleHeight;
  final Animation<EdgeInsets> capybaraPadding;
  final Animation<double> staticStackOpacity;
  final Animation<EdgeInsets> staticStackPadding;
  final Animation<double> capybaraSizeFactor;
  final Animation<double> capybaraFinalHorizontalPosition;
  final Animation<double> capybaraFinalVerticalPosition;

  @override
  Widget build(BuildContext context) {
    return AnimatedBuilder(animation: controller, builder: _buildAnimation);
  }

  Widget _buildAnimation(BuildContext context, Widget? child) {
    return Stack(
      children: [
        Container(
          height: viewportSize.height,
          width: viewportSize.width,
          color: ColorTokens.capybaPurple,
          child: Stack(
            alignment: Alignment.center,
            children: [
              Opacity(
                opacity: staticStackOpacity.value,
                child: Padding(
                  padding: staticStackPadding.value,
                  child: const SplashStaticStack(withCapybara: false),
                ),
              ),
              SizedBox(
                width: 308,
                child: Stack(
                  alignment: Alignment.center,
                  children: [
                    Positioned(
                      right: capybaraFinalHorizontalPosition.value,
                      top: capybaraFinalVerticalPosition.value,
                      child: Visibility(
                        visible: controller.value > 0.20,
                        child: Center(
                          child: Padding(
                            padding: capybaraPadding.value,
                            child: Image.asset(
                              CapybaDayTwentyThreeTestImages.capivara,
                              width: 184.4 * capybaraSizeFactor.value,
                              height: 191.7 * capybaraSizeFactor.value,
                            ),
                          ),
                        ),
                      ),
                    ),
                  ],
                ),
              ),
            ],
          ),
        ),
        Column(
          children: [
            Container(
              width: viewportSize.width,
              height: grayHeight.value,
              color: ColorTokens.capybaGray,
            ),
            Expanded(
              child: Container(
                width: viewportSize.width,
                color: ColorTokens.capybaPink,
              ),
            ),
            Expanded(
              child: Container(
                width: viewportSize.width,
                color: ColorTokens.capybaYellow,
              ),
            ),
            Container(
              width: viewportSize.width,
              height: purpleHeight.value,
              color: Colors.transparent,
            ),
          ],
        ),
      ],
    );
  }
}
As it can be seen, a complex outcome can be achieved with a relatively simple code. With proficiency, a developer can produce this in one or two hours.
Comparing the difficulty of implementing both examples presented here, one can say that although the animated version is a bit more complex, it didn’t take that much time to implement. To understand how it could benefit the feeling of the end-user, I’ve run a pool to evaluate the aesthetics and general feel. Far from being a valid robust statistics but serving as a piece of evidence, it points out that choosing the animated version could represent a real improvement in general app perception.
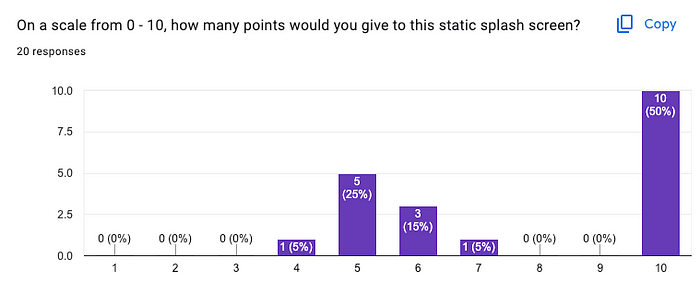
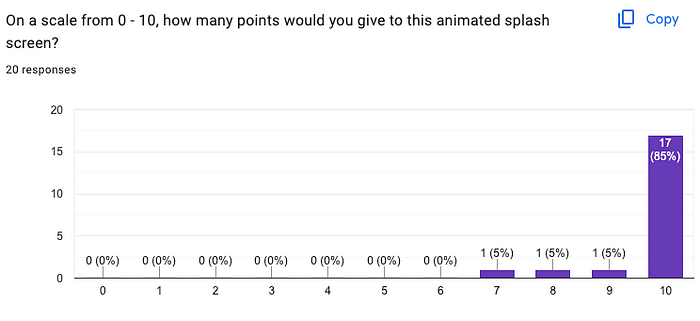
Static version averaged to 7.7 while the animated version averaged to 9.7 on a 0–10 scale. (I know, I know… There are just to few votes to build a real statistics, but I think that it points the main perception).
With Flutter as a tool, we can bring together developers and designers to discuss real value to the product they work to build. The decisions made in real projects must consider all the resources available, and evaluate the real value a particular design might actually add to the final product. The point is that, with some proficiency, the developers will not talk about the feasibility of designs blindsighted, and the decision can be made in a more balanced way.
I would like to dedicate a special thank you to our designer José Gervásio for proposing such an amazing design that was pretty fun to implement.
This project was implemented as part of the Capyba Day 2023, live coded in about 1h!. The final code is available in the github repository. Any suggestions and improvements please, be my guest and leave a comment.